

Corel Painter Brushes For Photoshop
HOW TO BRING A COREL PAINTER BRUSH INTO PHOTOSHOP
 I will be taking a few weeks off from blogging to "regroup" – need to get caught up with both my favorite programs – Photoshop and Painter. But for this week I am going to carry on with my tree theme a little more since I seem to like to do tree images! Not sure why???
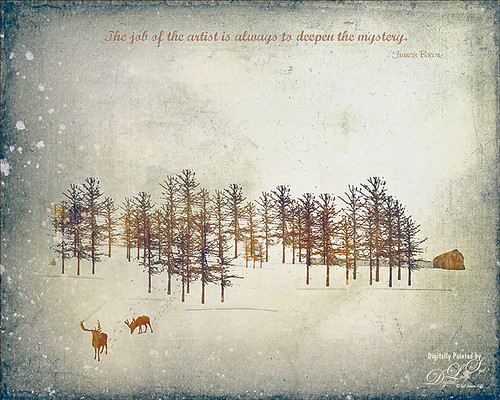
Created the above because I love this Bare Trees Brush that Karen Bonaker made in her Happy Holiday a Day brushes for Corel Painter. (It is in a few of my other blogs too.) This time it was turned into a Photoshop brush and below is how it was done.
Creating a Photoshop Brush Out of a Corel Painter Stroke
1. Open Corel Painter and set foreground color to black on a white canvas by setting the Color Wheel RGB sliders all the way left.
2. Select a brush in Painter to bring into Photoshop – in this case Karen's wonderful Bare Brush Tree for me. The stroke can be placed on its own layer or just on the bottom white canvas. With Painter, there are lots of ways to adjust the actual brush to adjust the dab. What was done above was to just use Karen's basic brush (and which I like). Save the file keeping it as a PSD file.
3. Open the file in Photoshop and turn it in a brush by going to Edit -> Define Brush Preset. The wonderful Painter brush has been converted to a brush in Photoshop, listed at the bottom of the Brush Preset Panel!
4. Make adjustments to the new brush in the Photoshop Brush Panel. For the brush used above, these settings were applied: Basic Tip Shape – Size 1190 and Spacing 63%; Shape Dynamics – Size Jitter 36% and Control set to Pen Pressure; Scattering – Scatter 30%, Control Pen Pressure, and Count 1; Texture – Texture set to Burlap and Invert was checked, Scale 100%, Brightness -29, Contrast 33, Check Texture Each Tip, Mode Multiply, Depth 100%, and Depth Jitter 38%; Color Dynamics – Check Apply Per Tip, Foreground/Background 11%, Saturation Jitter 12%, and Brightness Jitter 13%; and check Smoothing. The texture in the brush is due to the settings in Photoshop, not Painter, so the Texture setting can easily be turned off or changed if the effect is not right. Try adding a Dual Brush to get a snowy tree look or Wet Edges for a watercolor feel. Experiment with all these settings!
5. Last step is to start painting with your new brush – in this case, just painted a treeline of trees. If you like your brush, now is the time to go to the bottom of the Brush Preset Panel and select Save Brush. Usually I end up with several different variations of the brush and as a last step will save them together as a set in the Preset Manager by clicking on the 2nd icon on either Brush Panel or Brush Preset Panel – select each one (CTRL+click on each brush variation) and then Save Set. If the brush gets deleted, it can easily be added back in the Brush Preset Panel.
The rest of the image steps are as follows: Added 2 Lil Owls Enchanted4-1 overlay (see sidebar at my Tidbits Blog for website link), a New Layer with just some line definition, three more New layers – one with Shadowhouse Creations Fence brush, one with the two dear using different brushes, and one with the Barn1 brush; a New Layer with the painted deer tracks; Texture Mate's Free Grunge Texture (was Original Starfield) set to 85% layer opacity and a layer mask painting out the center of the image – it really has a vintage snow look to it; a New Layer using the Sharpen Tool just on the deer faces; and my SJ Snow 2 Overlay-slight blur set to 53% layer opacity. Two Text Layers were used – first with Marcelle Script font and then Kayleigh font. Topaz (see sidebar for website link) ReStyle was added and the Peppermint Gray preset was applied at 75% layer opacity. And there you have it – a pretty nice wintry scene!
 This is another example of using the above brush. This time a new brush was created by combining a few strokes so it looks like a treeline. Then on a New Layer above the Background Layer, just a couple strokes were used in the image making the brush smaller for the distant trees. After that a couple of my textures were placed underneath the trees and a stamped layer was placed on top (CTRL+ALT+SHIFT+E). In Nik Analog Efex Pro 2, these settings were used: Basic Adjustments (Detail Extraction 22%, Brightness -17%, Contrast -15%, and Saturation 27% – and then 4 Control Points were added to image to pinpoint the detail and brightness exactly), Dirt & Scratches (Strength 26%, Organic, bottom center example), Lens Vignette (Amount -62%, Circle more than Rect, and Size 100%), Film Type ( B&W toned third down 2nd over, Faded, Strength 79%, Grain per pixel 500, and Soft), and Levels & Curves (100% opacity and Luminosity – one point -pull up slightly in upper left). Back in Photoshop, a Gradient Map Adjustment Layer set to Foreground to Background and in the Layer Style set the Blend If Underlying Layer black tab split to 55 and 116 (Alt + drag on the tab to split). Nik Viveza 2 was used to add emphasis to the final tree. Very different look from the first one!
Hope this gave you some ideas on how to use your brushes and how to bring them in from other programs. Not too hard and worth the time if you are using the Painter brush a lot. Will catch up with everyone in a couple weeks!…..Digital Lady Syd
Corel Painter Brushes For Photoshop
Source: https://sydspix.wordpress.com/2015/01/24/how-to-bring-a-corel-painter-brush-into-photoshop/
Posted by: baileyclinguen1988.blogspot.com
I personally like your post; you have shared good insights and experiences. Keep it up. brochure printing discounts
ReplyDelete